A sweet, chocolatey aroma wafts through the air, instantly transporting me back to family gatherings and cozy evenings. There’s something truly heartwarming about making an Old-Fashioned Chocolate Pie; its silky filling nestled in a perfectly flaky crust is the epitome of comfort food. What I love most about this classic dessert is its straightforward preparation, making it an ideal choice for busy nights or unexpected guests. Plus, with the option to quickly modify it for dietary preferences, anyone can indulge in a slice of nostalgia. Are you ready to recreate this delightful pie that’s sure to become a staple in your home? Let’s dive in!

Why is This Chocolate Pie a Must-Try?
Decadent Chocolate Bliss: The rich chocolate filling delivers an indulgent taste that truly satisfies your sweet tooth.
Quick & Easy: Whipping up this dessert takes just a few simple steps, making it perfect for any occasion.
Versatile Options: With potential substitutes for vegan and gluten-free diets, everyone can enjoy a slice.
Crowd-Pleasing Delight: Whether for a family gathering or a casual dinner party, this pie will be a hit with all.
Timeless Comfort: Relive cherished memories with every bite, reminding you of cozy evenings and warm kitchens.
For an even sweeter experience, try serving it alongside some Chocolate Waffles Decadent or bake some delightful Harvest Marble Chocolate Chip Cookies to share!
Old-Fashioned Chocolate Pie Ingredients
For the Filling
• Granulated Sugar – Provides sweetness to balance the rich chocolate flavor. Substitution: Use a sugar alternative for a lower-calorie option.
• Unsweetened Cocoa Powder – Adds chocolate essence to the filling. Substitution: Dark chocolate cocoa can be used for a richer taste.
• All-Purpose Flour – Gives structure to the pie filling. Substitution: Gluten-free flour can be a suitable replacement.
• Fine Sea Salt – Enhances the flavor of the chocolate. No substitutions needed.
• Egg Yolks – Helps achieve a creamy and silky texture in the filling. Substitution: Silken tofu blended until smooth can be used for a vegan version.
• Whole Milk – Adds richness to the filling. Substitution: Almond or oat milk can be suitable dairy-free alternatives.
• Unsalted Butter – Provides a glossy finish and richness to the filling. Substitution: Vegan butter or coconut oil can be used for a vegan alternative.
• Pure Vanilla Extract – Enhances overall flavor profile. No substitutions needed.
For the Crust
• Pre-baked Pie Crust – Serves as the base for holding the chocolate filling. Substitution: A store-bought pie crust can save time.
Enjoy creating your Old-Fashioned Chocolate Pie filled with delightful memories and delicious flavors!
Step‑by‑Step Instructions for Old-Fashioned Chocolate Pie
Step 1: Prepare the Dry Ingredients
In a medium saucepan, whisk together 1 cup of granulated sugar, ⅓ cup of unsweetened cocoa powder, ⅓ cup of all-purpose flour, and a pinch of fine sea salt until the mixture is completely lump-free. This will ensure a smooth filling for your Old-Fashioned Chocolate Pie. Set the saucepan aside while you work on mixing the wet ingredients.
Step 2: Mix the Wet Ingredients
In a separate bowl, blend together 4 large egg yolks and 2 cups of whole milk until the mixture is creamy and well-combined. This step is crucial for achieving the velvety filling you desire. Once the egg and milk mixture looks smooth, gradually incorporate it into the dry ingredients in the saucepan, whisking continuously to prevent any lumps from forming.
Step 3: Cook the Filling
Place the saucepan over medium heat, stirring constantly with a whisk or spatula for about 7 to 10 minutes. Watch closely as the mixture begins to thicken, transitioning from a runny consistency to a pudding-like texture. The filling should coat the back of a spoon when done. This step is key to creating that rich chocolate filling for your Old-Fashioned Chocolate Pie.
Step 4: Add Flavor and Texture
Once thickened, remove the saucepan from the heat and immediately stir in 2 tablespoons of unsalted butter and 1 teaspoon of pure vanilla extract. Mix until the butter is fully melted and the filling is glossy and smooth. This is where the flavor comes to life—your chocolate filling should now look irresistible!
Step 5: Fill the Pie Crust
Carefully pour the warm chocolate filling into the pre-baked pie crust, using a spatula to smooth out the top gently. This step will ensure an even layer of filling, ready to set perfectly. Make sure the crust is already cooled, as adding warm filling can cause it to lose its crispness.
Step 6: Cool and Chill
Allow your Old-Fashioned Chocolate Pie to cool at room temperature for about 30 minutes before placing it in the refrigerator. Chill the pie for at least 3 to 4 hours, or until the filling is firm and set. This resting period is essential for achieving the silky texture that defines this delightful dessert.
Step 7: Serve and Enjoy
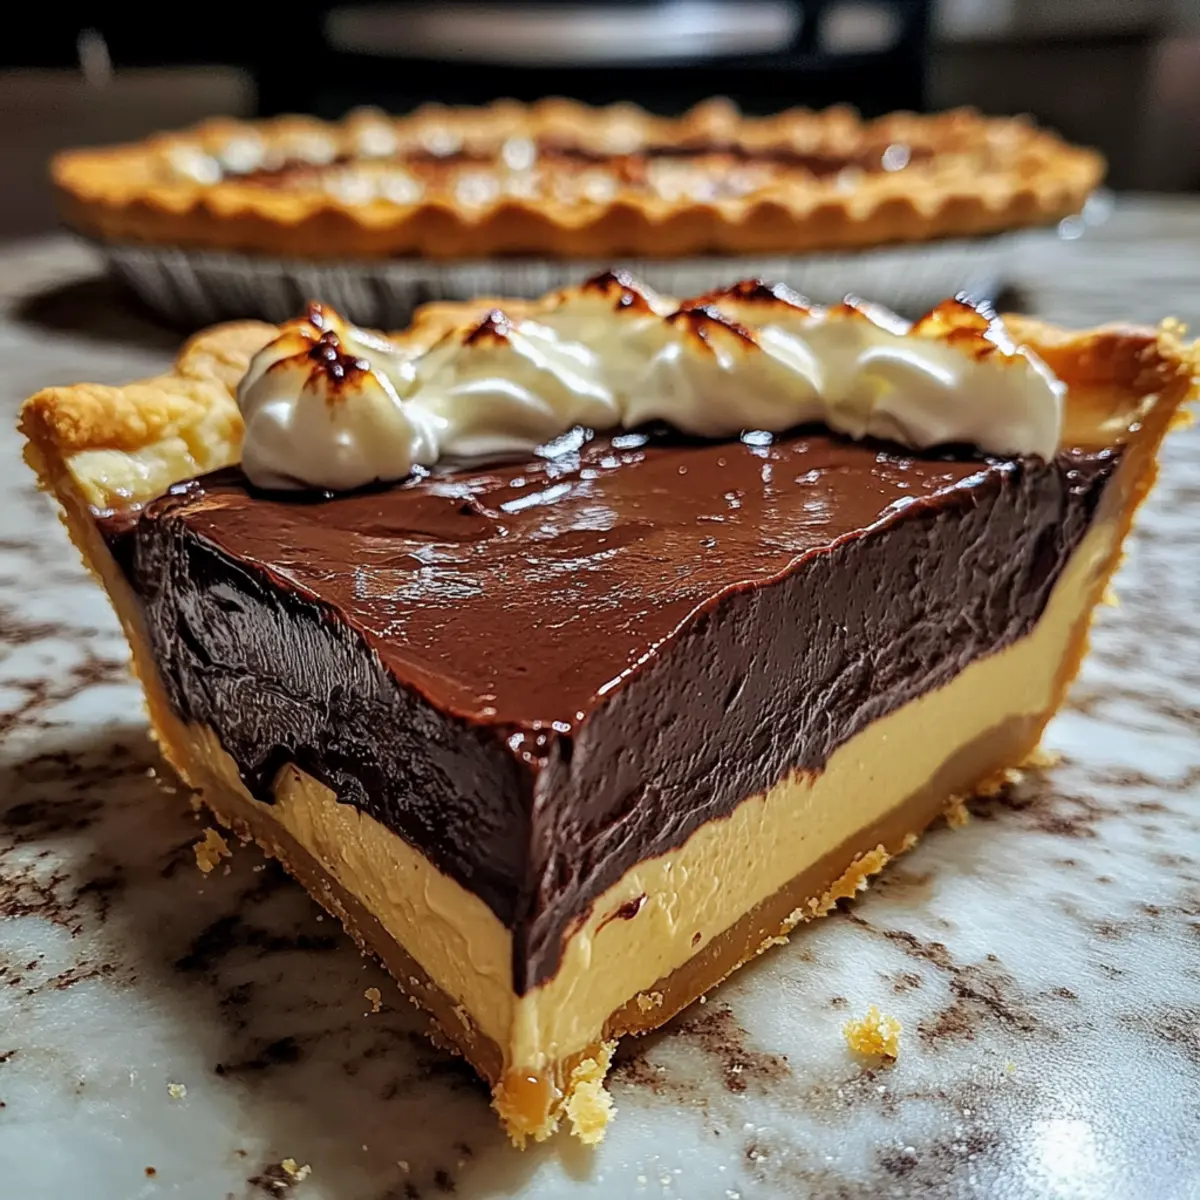
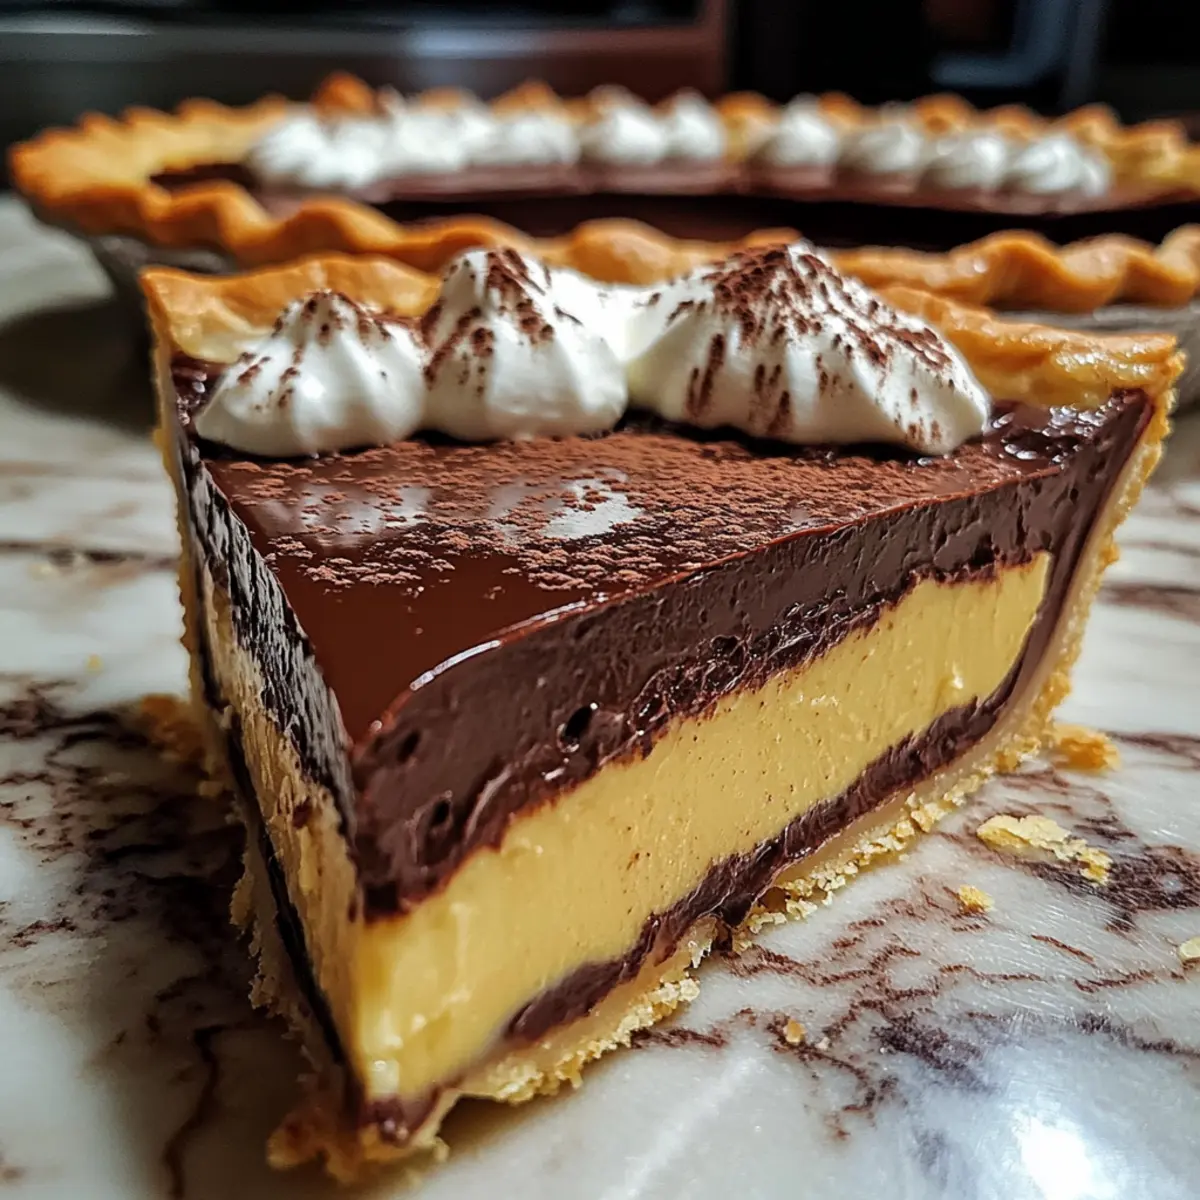
Once fully chilled, slice the pie into wedges and serve chilled. You can top each slice with a dollop of whipped cream or chocolate shavings for an added touch of decadence. This final presentation is sure to impress your family and friends as they indulge in the rich flavors of your homemade Old-Fashioned Chocolate Pie.
Old-Fashioned Chocolate Pie Variations
Feel free to personalize your Old-Fashioned Chocolate Pie to suit your taste and dietary needs—let your creativity shine!
-
Vegan Option: Substitute silken tofu for egg yolks and use almond milk instead of whole milk for a plant-based twist. This keeps the rich texture while making it suitable for vegan diets.
-
Gluten-Free Delight: Swap all-purpose flour with a gluten-free flour blend. This way, everyone can enjoy a slice without the worry of gluten.
-
Mocha Flavor: Add a tablespoon of espresso powder to the filling for a delicious mocha twist. The coffee complements the chocolate beautifully and adds depth.
-
Nutty Crunch: Stir in chopped walnuts or pecans into the chocolate filling before setting. This adds a delightful crunch and a hint of nuttiness.
-
Minty Freshness: Incorporate a teaspoon of peppermint extract into the filling for a refreshing mint flavor that pairs wonderfully with chocolate.
-
Spicy Kick: For the adventurous, a dash of cayenne pepper can give your pie a subtle heat that elevates the chocolate’s richness. It’s an unexpected yet delightful surprise!
-
Coconut Cream: Replace unsalted butter with coconut oil and top with toasted coconut flakes. This will give your pie a tropical vibe that’s simply irresistible.
-
Decadent Toppings: Consider drizzling your pie with homemade chocolate ganache or adding a layer of whipped cream for extra indulgence. For a special occasion, why not serve it alongside Chocolate Christmas Cupcake or a festive Chocolate Christmas Sprinkle dessert?
Feel free to play around with these ideas, making this Old-Fashioned Chocolate Pie uniquely yours!
What to Serve with Old-Fashioned Chocolate Pie?
There’s nothing quite like a well-rounded meal that complements the sweet, chocolatey bliss of this delightful dessert, ensuring every bite is a celebration.
-
Creamy Vanilla Ice Cream: The smoothness of vanilla ice cream perfectly contrasts the rich chocolate filling, offering a cool, creamy balance. It’s a classic pairing that turns your slice into a sundae delight.
-
Fresh Berries Medley: A mix of strawberries, raspberries, and blueberries provides a refreshing tartness that cuts through the richness of the pie. Their vibrant colors also add a beautiful touch to your dessert presentation.
-
Whipped Cream Topping: Light and airy, whipped cream makes the perfect finishing touch, enhancing the pie’s flavors while providing a fluffy texture that invites each bite. Add a drizzle of chocolate sauce for a decadent twist!
-
Coffee or Espresso: A warm cup of coffee or espresso elevates the dessert experience, enhancing chocolate’s flavors while providing a comforting warmth. It’s a delightful way to round off the meal.
-
Chocolate Chip Cookies: Serving a few homemade chocolate chip cookies alongside adds a bit of nostalgia and variety to the dessert spread. The chewy texture contrasts with the pie’s smoothness for a delightful duo.
-
Nutty Caramel Sauce: A drizzle of homemade or store-bought caramel sauce adds a rich nuttiness that complements the chocolate filling. Serve it warm for an inviting pour that enhances each bite.
-
Dark Chocolate Shavings: A sprinkle of dark chocolate shavings on top of the pie or alongside adds an extra touch of elegance and intensifies the chocolate experience, making every bite even more indulgent.
-
Mint Infused Green Tea: To cleanse the palate, a soothing cup of mint tea provides refreshing notes that balance the sweet chocolate pie. Its herbal aroma elevates the dining experience in a light, refreshing way.
Storage Tips for Old-Fashioned Chocolate Pie
Fridge: Store your Old-Fashioned Chocolate Pie in the refrigerator for up to 3 days. Cover it with plastic wrap or place it in an airtight container to keep it fresh.
Freezer: If you want to enjoy it later, wrap individual slices in plastic wrap, then place them in a freezer-safe container for up to 2 months. Thaw in the fridge before serving.
Reheating: This pie is best served chilled, but if you prefer a warm slice, gently reheat it in the microwave for about 15-20 seconds. Just be careful not to overheat, as it can alter the texture.
Serving: For the best experience, slice and serve your pie straight from the fridge, optionally topped with whipped cream or chocolate shavings for a delightful finish.
Make Ahead Options
These Old-Fashioned Chocolate Pies are a fantastic option for meal prep enthusiasts! You can prepare the filling up to 24 hours in advance, storing it in an airtight container in the refrigerator to prevent it from developing a skin. Additionally, bake the pie crust a day before, allowing it to cool completely. When ready to serve, simply reheat the filling gently on low heat until warm and pour it into the pre-baked crust. Chill the assembled pie for at least 3-4 hours, ensuring it has time to set properly. This way, when dessert time rolls around, you’ll have a delightful treat that’s just as delicious as if made fresh!
Expert Tips for Old-Fashioned Chocolate Pie
-
Whisk Well: To avoid lumps in your filling, ensure you whisk the dry ingredients thoroughly before adding the wet mixture. This step is crucial for a smooth Old-Fashioned Chocolate Pie.
-
Check Crust Doneness: Before pouring in the filling, make sure your pie crust is fully pre-baked. An undercooked crust can lead to a soggy base, compromising the texture.
-
Chill Properly: Allow the pie to chill completely in the refrigerator for at least 3-4 hours. This will ensure the filling sets properly and maintains its silky texture when sliced.
-
Strain if Needed: If any lumps form during cooking, strain the filling through a fine mesh sieve before pouring it into the crust. This guarantees a velvety finish.
-
Add a Personal Twist: Consider elevating your filling by adding a pinch of espresso powder or a splash of bourbon for an adult twist that enhances the chocolate flavor beautifully.
Old-Fashioned Chocolate Pie Recipe FAQs
How do I choose the best cocoa powder for my pie?
Absolutely! For deeper flavor, opt for unsweetened cocoa powder that’s natural and unsweetened. If you’d like a richer taste, dark chocolate cocoa works perfectly. Just make sure it’s high-quality to give your Old-Fashioned Chocolate Pie the best chocolate essence!
What’s the best way to store my leftover pie?
You can store your Old-Fashioned Chocolate Pie in the refrigerator for up to 3 days. Just cover it with plastic wrap or place it in an airtight container to keep it fresh and delicious. And remember, always let the pie cool completely before storing to maintain its texture!
Can I freeze leftover pie slices?
Certainly! Wrap individual slices tightly in plastic wrap, and place them in a freezer-safe container. Your Old-Fashioned Chocolate Pie can last up to 2 months in the freezer. To enjoy, simply thaw it overnight in the refrigerator before serving.
What if my filling turns out lumpy?
Don’t worry! If you encounter lumps in your filling, simply strain the mixture through a fine mesh sieve before pouring it into the crust. This will ensure a smooth texture. Also, to prevent lumps from forming in the first place, be sure to whisk the dry ingredients thoroughly and stir constantly while cooking.
Are there any allergy considerations for this pie?
Yes! Since this pie contains eggs and dairy, those with allergies should consider using vegan alternatives. Substitute silken tofu for egg yolks, almond or oat milk for whole milk, and vegan butter or coconut oil instead of regular butter. These simple switches make it easier for everyone to enjoy your Old-Fashioned Chocolate Pie!

Old-Fashioned Chocolate Pie: Indulgence Made Easy at Home
Ingredients
Equipment
Method
- Prepare the Dry Ingredients: In a medium saucepan, whisk together sugar, cocoa powder, flour, and salt until lump-free.
- Mix the Wet Ingredients: In a bowl, blend egg yolks and milk until creamy. Gradually incorporate into the dry ingredients, whisking to prevent lumps.
- Cook the Filling: Place the saucepan over medium heat, stirring constantly for about 7 to 10 minutes until it thickens.
- Add Flavor and Texture: Remove from heat and stir in butter and vanilla until glossy and smooth.
- Fill the Pie Crust: Pour the warm chocolate filling into the pre-baked crust, smoothing out the top gently.
- Cool and Chill: Allow to cool at room temperature for 30 minutes, then refrigerate for at least 3 to 4 hours until set.
- Serve and Enjoy: Slice the pie into wedges and serve chilled, optionally topped with whipped cream or chocolate shavings.
Leave a Reply