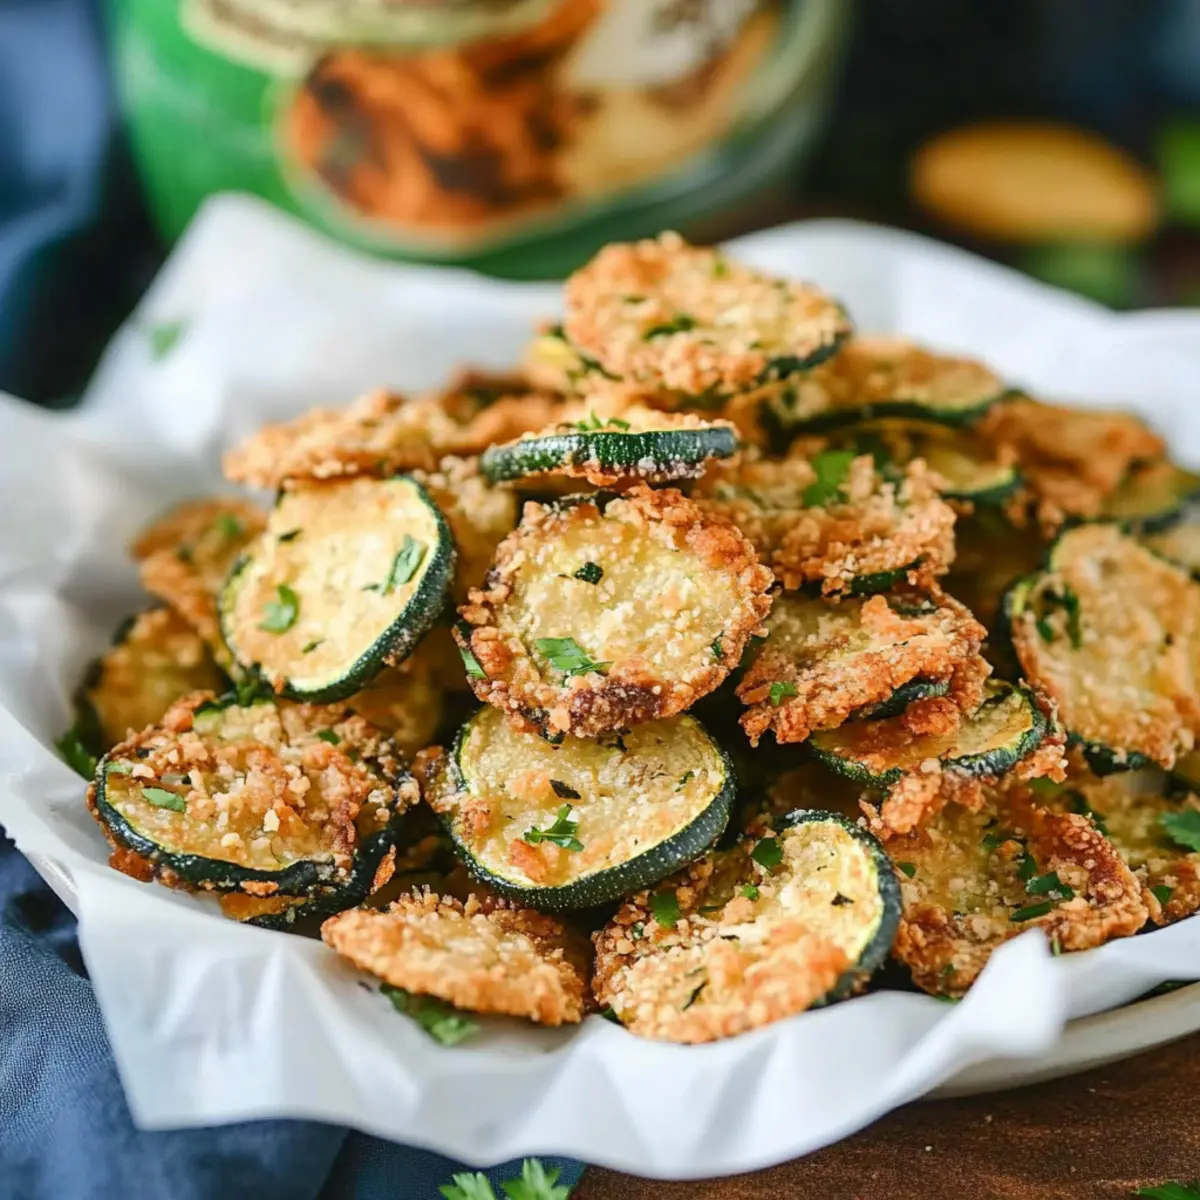
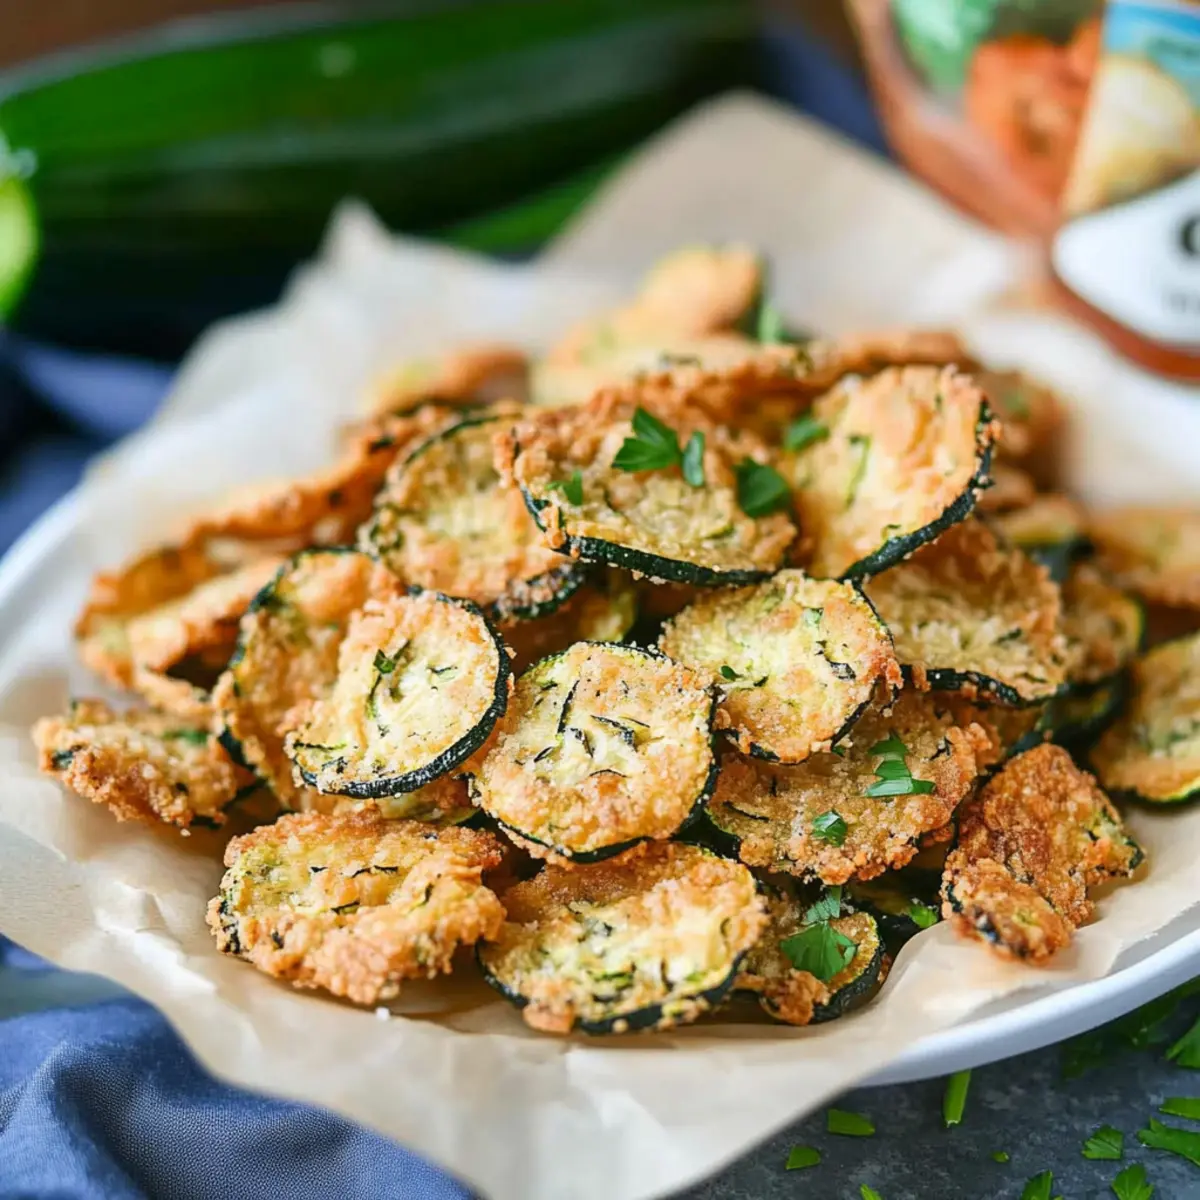
As I rummaged through my kitchen last week, I discovered a bag of bright green zucchinis just waiting for their moment to shine. After a busy week, I craved something light yet satisfying, and that’s when the idea struck me: Crispy Baked Zucchini Chips. These baked delights are both crunchy and flavorful, providing a guilt-free alternative to traditional snacks. Not only are they incredibly quick and easy to whip up, but they also offer a great way to sneak in some veggies without sacrificing taste. Perfect for munching on during movie night or as a vibrant side dish, these baked zucchini chips will keep your cravings in check while making you feel good about what you’re eating. Are you ready to transform your zucchinis into something truly scrumptious? Let’s dive in!
Why Choose Baked Zucchini Chips?
Crispy Texture: These zucchini chips bring a satisfying crunch that rivals any fried snack, so you’ll never miss the guilt of traditional chips!
Quick Preparation: With minimal ingredients and easy steps, this recipe can be ready in under 30 minutes, making it a perfect last-minute snack or appetizer.
Versatile Options: Feel free to experiment! Swap in Panko breadcrumbs or other veggies like eggplant for a tasty twist.
Healthy Snacking: Packed with nutrients and low in calories, these chips are an excellent way to enjoy a healthy lifestyle without sacrificing flavor—just like my Buffalo Chicken Baked potatoes!
Crowd-Pleaser: Serve them at your next gathering or movie night, and watch them disappear faster than you can say “zucchini”!
Baked Zucchini Chips Ingredients
For the Chips
• Zucchinis – The star of the dish, thinly sliced into 1/4-inch rounds for that perfect crisp.
• Garlic Powder – Adds a savory depth; feel free to substitute with onion powder for a different twist.
• Milk – Binds the coating; use almond milk for a dairy-free delight or skip entirely.
• Large Egg – Acts as a binder; swap with a flax egg or aquafaba for an egg-free version.
• Kosher Salt and Black Pepper – Essential for flavor; adjust to suit your taste perfectly.
• Kettle Brand® Himalayan Salt Potato Chips – Adds noticeable crunch and flavor; use any flavored chip or crushed Panko for variety.
• All-Purpose Flour – Helps the coating stick; for gluten-free chips, opt for almond flour or a gluten-free blend.
• Chopped Fresh Parsley – A splash of color and freshness; feel free to mix in other herbs for added flair.
Step‑by‑Step Instructions for Crispy Baked Zucchini Chips
Step 1: Preheat the Oven and Prepare the Baking Sheet
Begin by preheating your oven to 425°F (220°C). While it warms up, grab a baking sheet and either lightly oil it or spray it with a nonstick cooking spray to prevent sticking. This will ensure your crispy baked zucchini chips come out easily and have that perfect crisp texture without any fuss.
Step 2: Season the Zucchini Rounds
Take your thinly sliced zucchini rounds and place them in a large bowl. Sprinkle garlic powder, kosher salt, and black pepper over the slices, tossing gently to cover them evenly. This step infuses your zucchini with vibrant flavor that will shine through in your crispy baked zucchini chips, so make sure they’re well seasoned.
Step 3: Prepare the Milk and Egg Mixture
In a separate bowl, whisk together one large egg and a splash of milk until combined. This mixture acts as the glue to help the coating stick to your zucchini chips. Set this bowl aside, as you’ll need it shortly to dip your seasoned zucchini rounds for extra crunch that complements the baking process beautifully.
Step 4: Dredge the Zucchini Rounds
Now, it’s time to coat your zucchini rounds. First, dredge each piece in all-purpose flour, shaking off any excess. Next, dip the floured zucchini in your milk and egg mixture before transferring it to a plate with crushed Kettle Brand® chips. Press gently to ensure the chips adhere well, creating a crunchy layer that will give your baked zucchini chips that satisfying crunch.
Step 5: Arrange on Baking Sheet
Carefully arrange the coated zucchini rounds in a single layer on your prepared baking sheet. Be sure not to overcrowd the pan, as this can lead to uneven baking. Slide the baking sheet into your preheated oven, and if you wish, give them a light spray of nonstick spray on top for an extra crispy finish.
Step 6: Bake to Perfection
Bake your crispy baked zucchini chips for 22 to 26 minutes, or until they are golden brown and crisp. Keep an eye on them as they approach the end of the baking time, and consider rotating the tray halfway through for even cooking. Your kitchen will start to smell fantastic, and those beautiful chips will beckon you to taste them!
Step 7: Serve and Garnish
Once your zucchini chips are done baking, remove them from the oven and let them cool for a few moments. For an added touch of freshness, sprinkle chopped parsley on top, if desired. Serve your crispy baked zucchini chips immediately for the best texture, either on their own or alongside your favorite dipping sauce.

Make Ahead Options
These Crispy Baked Zucchini Chips are perfect for meal prep, allowing busy home cooks to enjoy a crunchy snack without the last-minute hassle! You can slice and season the zucchini rounds up to 24 hours in advance, simply refrigerating them in an airtight container to prevent moisture. Additionally, you can prepare the milk and egg mixture, storing it separately in the fridge to maintain freshness. When you’re ready to serve, just dredge the zucchini in flour, coat them with crushed Kettle Brand® chips, and bake as directed. This way, you’ll get that same delightful crunch while saving precious time for your meals!
Baked Zucchini Chips Variations
Customize your baked zucchini chips to delight your taste buds with these exciting twists!
-
Gluten-Free: Swap all-purpose flour for almond flour or a gluten-free blend to make these chips suitable for gluten-sensitive diets. They’ll be as deliciously crunchy as ever!
-
Dairy-Free: Use almond milk instead of regular milk to keep things creamy without any dairy. It’s a fantastic way to enjoy the same crispiness while catering to dietary preferences.
-
Egg-Free: Try using a flax egg or aquafaba instead of a large egg as a binder for a vegan version. You won’t even miss the egg in these scrumptious crispy chips!
-
Spicy Kick: Add cayenne pepper or smoked paprika into the coating mixture for a fiery twist. This brings an exciting heat that pairs wonderfully with dipping sauces like creamy ranch or tangy salsa.
-
Flavor Boost: Experiment with different flavored chips, like BBQ or sour cream and onion, for a unique taste. Your zucchini chips will take on a whole new personality with every bite!
-
Vegetable Alternatives: Use eggplant or sweet potatoes instead of zucchini for variety. They provide a lovely flavor and texture that make each chip experience distinct and delightful.
-
Herb Infusion: Mix dried herbs such as oregano, rosemary, or Italian seasoning into the coating for added aroma and taste. Fresh herbs can also make a beautiful garnish on top!
-
Baked Sweet Potato Chips: Swap zucchini for thinly sliced sweet potatoes for a sweeter, yet equally crunchy snack. These not only give a different flavor but also bring extra nutrition to your table.
Looking for more delicious ideas? These crispy baked zucchini chips can be a flavorful treat alongside my Baked Apples Cinnamon for a sweet finish, or serve them with my Baked Teriyaki Chicken for a great meal combo!
Storage Tips for Baked Zucchini Chips
Room Temperature: Enjoy your baked zucchini chips fresh for the best crunch; otherwise, store them at room temperature for up to 2 hours before they become less crisp.
Fridge: Keep any leftovers in an airtight container in the fridge for up to 2 days. However, expect a loss of texture over time.
Freezer: If you want to freeze them, place your baked zucchini chips in a single layer on a baking sheet, freeze until solid, then transfer to an airtight bag. They can last for up to 1 month.
Reheating: To revive your baked zucchini chips, reheat them in a preheated oven at 350°F (175°C) for about 10 minutes, until crispy again.
What to Serve with Crispy Baked Zucchini Chips
Elevate your snacking experience by pairing these delightful chips with complementary sides and treats that will delight your taste buds.
- Creamy Hummus: This smooth dip adds creaminess and flavor, balancing the crunch of zucchini chips beautifully.
- Avocado Toast: A slice of buttery avocado toast makes for a delicious and satisfying addition, bringing healthy fats to your meal.
- Spicy Ranch Dressing: Pairing with a spicy ranch dressing will ignite your taste buds with a zesty kick, perfect for dipping!
- Tropical Salsa: Fresh mango or pineapple salsa adds a refreshing fruitiness, contrasting the savory flavors of the chips.
- Cheesy Quesadilla: A gooey cheese quesadilla makes for a comforting accompaniment, enhancing the savory goodness of your crispy snacks.
- Mixed Green Salad: A light salad with citrus vinaigrette will balance the richness of the chips, adding freshness to your plate.
- Crisp White Wine: A chilled glass of Sauvignon Blanc complements the flavors perfectly while adding an airy touch to your snack.
- Dark Chocolate Squares: For a sweet finish, indulge in dark chocolate squares to satisfy your sweet tooth after enjoying the savory chips.
- Brewed Iced Tea: A refreshing glass of brewed iced tea provides a cool and aromatic contrast to the crispy chips’ flavor showdown.
Expert Tips for Crispy Baked Zucchini Chips
-
Uniform Slicing: Cut zucchini into even 1/4-inch rounds to ensure consistent cooking; uneven slices may result in some chips being undercooked while others become too crisp.
-
Double Coating Option: For an extra crunch, after the first coating of chips, dip the zucchini in the milk and egg mixture again, followed by a second layer of crushed Kettle Brand® chips.
-
Expect Variable Baking Times: Keep an eye on your chips towards the end of the baking time. The thickness and moisture of zucchini can affect how long they need—every oven is slightly different!
-
Cooling for Crunch: Allow your crispy baked zucchini chips to cool on a wire rack for a few minutes post-baking to retain their crunch. Serving immediately helps prevent sogginess.
-
Storage Advice: Best enjoyed fresh! If you need to store leftovers, keep them in an airtight container, and reheat in the oven to restore crispness before serving.

Crispy Baked Zucchini Chips Recipe FAQs
How do I choose the best zucchinis for this recipe?
When selecting zucchinis, look for ones that are firm, smooth, and free of blemishes. Ideally, they should be medium-sized, as larger zucchinis can be overripe and may have more seeds. Pay attention to the skin; a vibrant green color indicates freshness while dark spots or softness are signs that the zucchini is past its prime.
What is the best way to store leftover baked zucchini chips?
To maintain their crispiness, it’s best to enjoy your crispy baked zucchini chips fresh. If you must store them, place them in an airtight container at room temperature for up to 2 hours, or keep them in the refrigerator for up to 2 days. Just keep in mind that refrigeration may cause them to lose some of that delightful crunch.
Can I freeze baked zucchini chips, and if so, how?
Absolutely! To freeze your baked zucchini chips, start by arranging them in a single layer on a baking sheet and freeze until solid. Once frozen, transfer them to an airtight freezer bag or container. They can last for up to 3 months. When you’re ready to enjoy them again, simply reheat in an oven at 350°F (175°C) for about 10 minutes until they regain their crispness.
What should I do if my zucchini chips aren’t crisping up?
If your zucchini chips turn out soggy, it could be due to several factors. First, ensure that the zucchini slices are evenly cut to allow for uniform cooking. For extra crunch, try using a wire rack on your baking sheet to elevate the chips and let air circulate around them. Lastly, if you’re not using a fan-assisted oven, consider increasing the baking time slightly, keeping a close eye to avoid burning.
Are these baked zucchini chips suitable for people with dietary restrictions?
Yes! This recipe is very flexible. For gluten-free options, substitute all-purpose flour with almond flour or a gluten-free flour blend. If you want to make it dairy-free, almond milk works great as a substitute for regular milk. You can also use a flax egg or aquafaba instead of the large egg for an egg-free alternative. Always check the ingredients of any flavored chips you use for allergens, especially if you have nut allergies.
How do I make these chips even more flavorful?
To elevate the flavor of your crispy baked zucchini chips, feel free to sprinkle on additional spices before baking, such as paprika, chili powder, or even Italian seasoning. You can also mix different types of chips for a unique blend of tastes or try adding nutritional yeast for a cheesy flavor without dairy!
Crispy Baked Zucchini Chips for Guilt-Free Snacking Bliss
Ingredients
Equipment
Method
- Preheat your oven to 425°F (220°C) and prepare a baking sheet by oiling or using nonstick spray.
- Season the sliced zucchini with garlic powder, kosher salt, and black pepper in a large bowl.
- Whisk together the egg and milk in a separate bowl to create the glue for the coating.
- Dredge each zucchini slice in all-purpose flour, dip in the milk and egg mixture, then coat with crushed potato chips.
- Arrange coated zucchini slices in a single layer on the baking sheet and spray lightly with nonstick spray.
- Bake for 22 to 26 minutes, or until golden brown and crisp, rotating halfway if needed.
- Cool for a few moments after baking, garnish with chopped parsley, and serve immediately.
Leave a Reply